A program for measuring and tuning a live-sound PA, on Windows and Mac. Plug a measurement mic into your audio interface, play the test signal through the speakers, and the program shows how the system really sounds at the mic, how much delay to set between speakers, whether one needs its polarity flipped, and which EQ to put on the system processor. Every result is an action you can take straight away.
What you need
- A measurement mic: omnidirectional with a flat response, such as a Behringer ECM8000, dbx RTA-M or miniDSP UMIK (USB). A vocal mic will not do: its tone is not flat.
- An audio interface with phantom power (+48 V) for the mic and at least one output.
- A cable from an interface output into the system (a console input, or straight into the system processor).
Install
- Windows: download TSoundSystemCheck-1.1.0-Windows-Setup.exe and double-click it (Windows 10 / 11, 64-bit; ASIO drivers work).
- Mac: download TSoundSystemCheck-1.1.0-macOS-Installer.pkg and double-click it, or use the .dmg and drag the app to Applications (macOS 10.13 or later, Intel and Apple Silicon). The files are notarized by Apple. The first time, macOS asks for microphone access: click Allow.
DEMO mode
No mic yet? Press SETTINGS and set the audio device type to Demo: a pretend PA with a main speaker (output 1), a sub (output 2) and two mics in the room (inputs 1 and 2). Press START and look at every page. (With no audio device at all, the program opens the demo by itself.) The next time the program opens, it uses your real interface again.
Your first measurement

- SETTINGS: audio device type ASIO (Windows, for an interface such as a Focusrite) or CoreAudio (Mac), then your interface as the device, then tick the inputs and outputs you use; 48 kHz and a 256–512 buffer. (The first time, the program opens the interface the computer uses by itself.)
- MIC IN: the input the measurement mic is on (up to 4 mics at once).
- OUT: the output that feeds the speaker you are measuring.
- REF INTERNAL: leave it. The program compares against its own test signal, so there is nothing more to wire. Choose an input as REF only when a loop-back cable goes into it (see REF below): an empty input gives a wrong, faint curve.
- Start with a low LEVEL (−30 dBFS), press START, then raise it until the pink noise is clearly louder than the room.
- After about 4 seconds the program finds the delay by itself, and the curves settle.
The top bar
- GENERATOR: the test signal, its LEVEL (dBFS RMS: every signal is equally loud at the same LEVEL) and START / STOP. The signal fades in and out and LEVEL changes glide, so a speaker never gets a step.
- Noise for measuring: Pink noise (recommended), White noise, Brown noise (more low end), Music noise (spectrum and peaks like music, 18 dB above the LEVEL: a realistic load for limiters), MLS (flat, no peaks).
- Sine sweep (20 Hz–20 kHz, 5 s) and Noise burst (0.5 s of pink, 0.5 s of silence).
- One frequency: Sine and Sine burst (10 cycles, then silence), with FREQ: pick a third-octave frequency or type any (e.g. 440 or 2.5k). Read a sine on RTA / SPL; MEASURE then shows only that one frequency.
- OUT: the outputs that play the test signal (several allowed). Whenever the outputs change, the measurement starts again and the delay is found again.
- MIC IN: the inputs of mics 1–4, and each mic's correction file: load the calibration file that came with a measurement mic (UMIK, ECM8000 and similar text files: frequency and dB per line). The program takes the mic's own response out of everything that mic measures, and the RTA bands; MEASURE shows "corrected with" and the file name. The file is remembered on this computer.
- REF: INTERNAL uses the program's own signal (no cable needed). Pick an input only when a loop-back cable from the console or processor output goes into it; then any signal works, including music during the show. With REF on an input that carries nothing, the curve is wrong and faint, and the program warns you.
- SESSION / SAVE: new, open, save (a .tssc file keeps the traces, the ALIGN results, the EQ settings and the routing). Ctrl+S / Cmd+S saves.
- MIC / REF: level meters with the peak in dBFS for the mic you are viewing and for the reference. Aim the mic for about −30 to −12 dB; red means too hot: lower the interface gain.
- TRIAL / LICENSED badge and SETTINGS (the audio interface, WINDOW SIZE: fit the screen or 70–130 %, and LANGUAGE: Auto (the computer's language), ไทย (Thai) or English; the new language shows the next time the program opens).
Stored graphs (left)
The measurements you keep are always listed on the left, on every page but TRACES (which has the full list).
- Click a colour square to show or hide that graph on the graphs (a crossed square is hidden).
- Double-click a name to rename it (e.g. "FOH", "Row 10").
- + STORE keeps the measurement now (the same as STORE AS TRACE), HIDE ALL / SHOW ALL, and DELETE the selected one (it asks first).
MEASURE
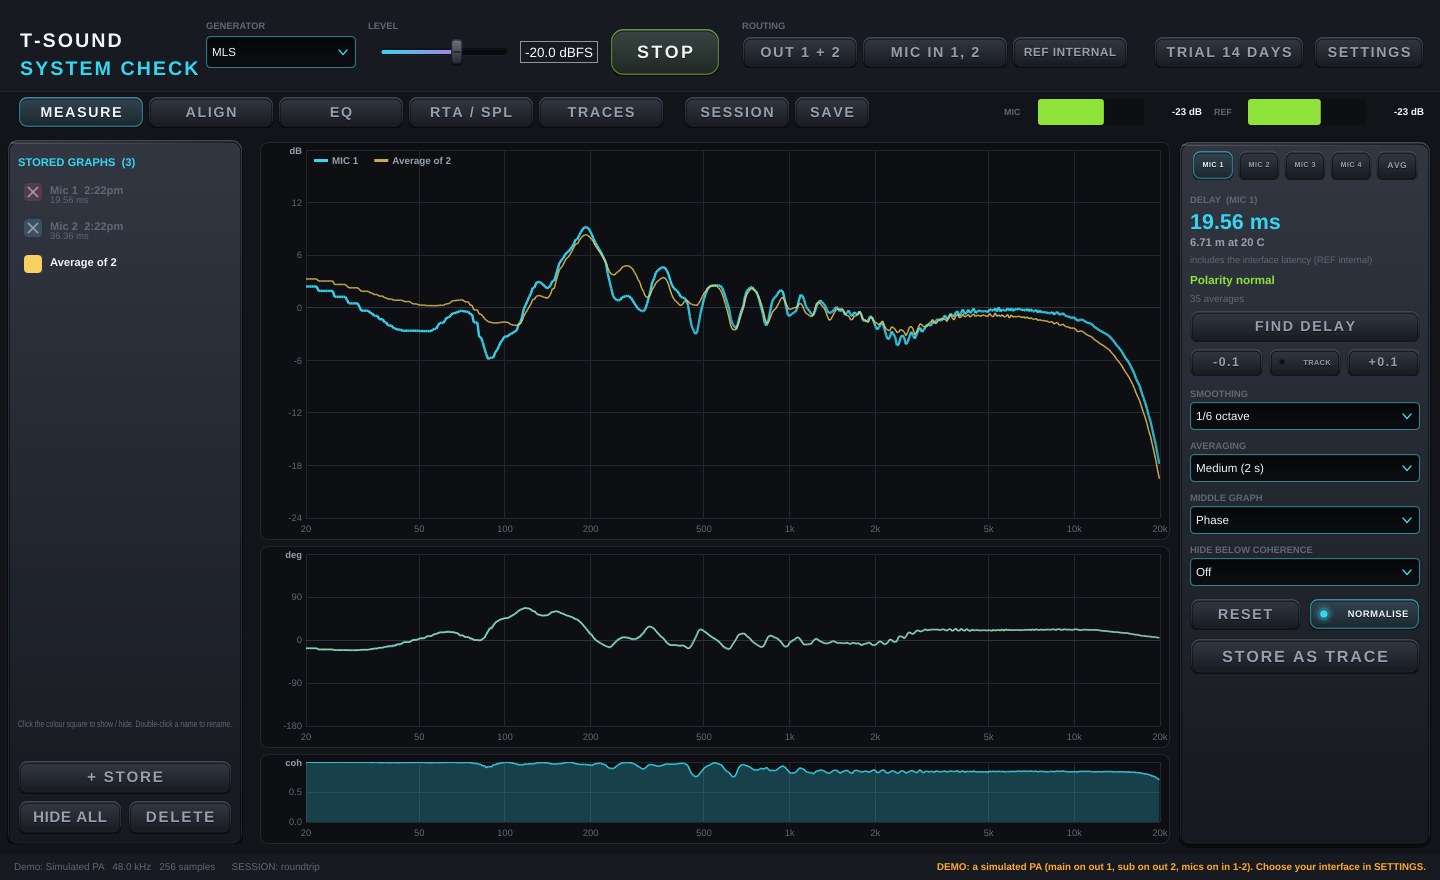
- Top graph (dB): the system's frequency response at the mic. The line fades where coherence is low (not to be trusted there).
- Middle graph (phase): the phase with the delay taken out. It should sit near 0 in the mid range.
- Bottom graph (coherence): how much each frequency can be trusted; 1.0 is fully. Low coherence means noise or reflections: raise the LEVEL or move the mic.
- MIC 1–4 / AVG: the mic to view, or AVG, the average of all mics (several positions in one take).
- DELAY: when the speaker's sound reaches the mic (ms and metres), and POLARITY INVERTED if it is flipped. With REF INTERNAL this includes the interface latency, so it is right for comparing speakers but is not a real distance.
- FIND DELAY: find the delay again. It normally runs by itself after START, a change of OUT, or a change of audio interface.
- −0.1 / +0.1: move the delay compensation by 0.1 ms by hand, to flatten the phase or line up the impulse. The average is kept.
- TRACK: find the delay again every 2 seconds while there is signal: for a mic you move, or music through a loop-back REF. Small changes keep the average.
- SMOOTHING: 1/3 to 1/48 octave (1/6 shows the overall shape well).
- AVERAGING: Fast / Medium / Slow, 16 or 64 frames then hold, or average until RESET.
- NORMALISE: puts the curve at 0 dB around 1 kHz, so its shape is easier to read.
- MIDDLE GRAPH:
- Phase.
- Group delay: how late each frequency arrives, in ms. A sub that lags the tops shows up as a hump in the low end.
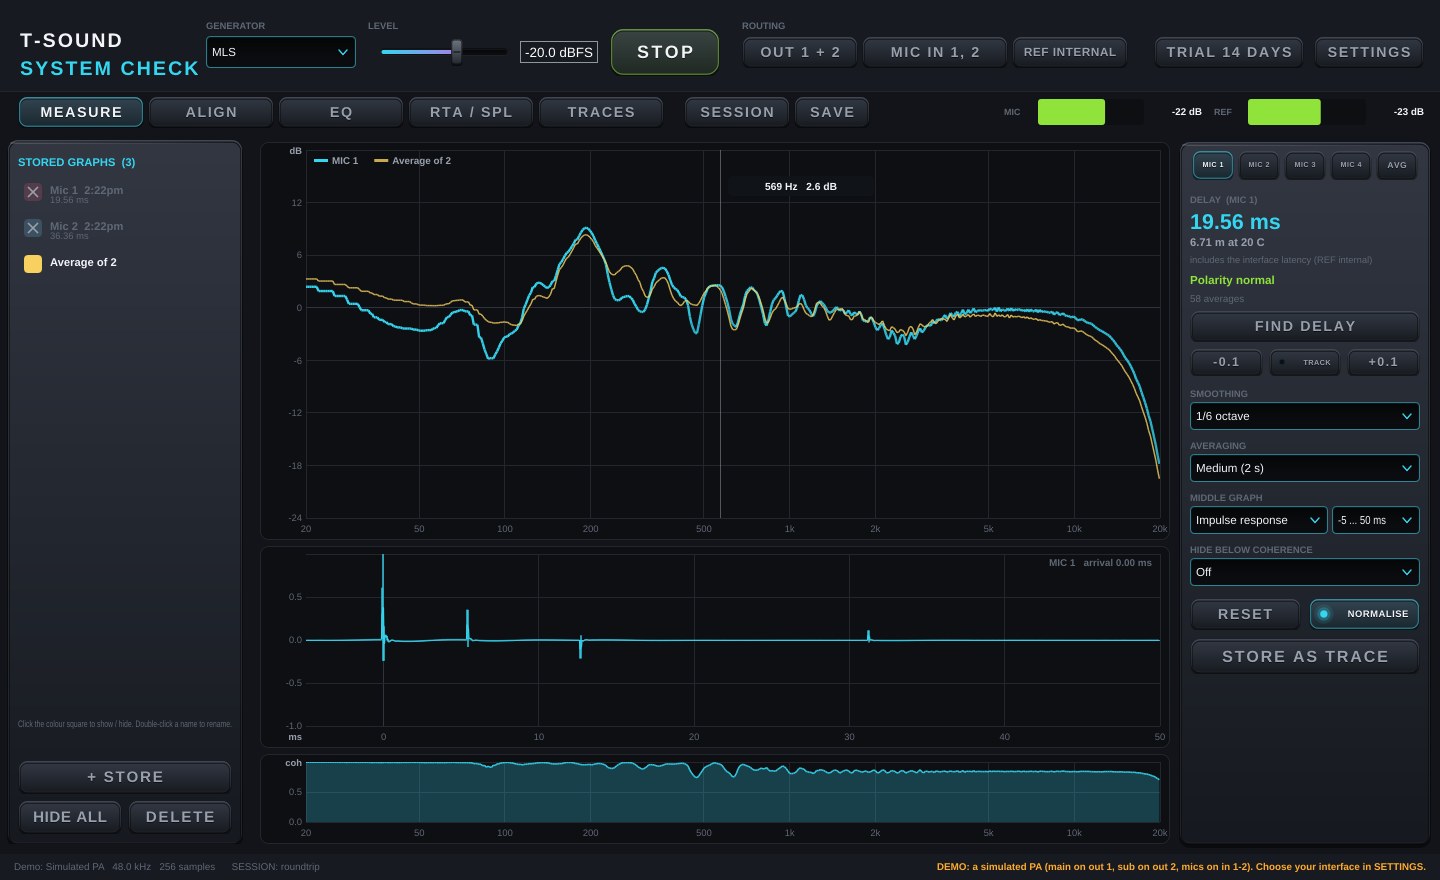
- Impulse response: the arrival at 0 ms, then the reflections, with their times; the title says if the polarity is inverted.
- ETC (log): the energy over time in dB, which shows reflections and decay clearly.
- A time range (−5…50, −10…150 or −20…300 ms) sits next to it for the impulse and the ETC.
- HIDE BELOW COHERENCE: off, 0.3, 0.5 or 0.7. Parts of the curves below it are hidden, and the coherence graph shows the threshold as a line.
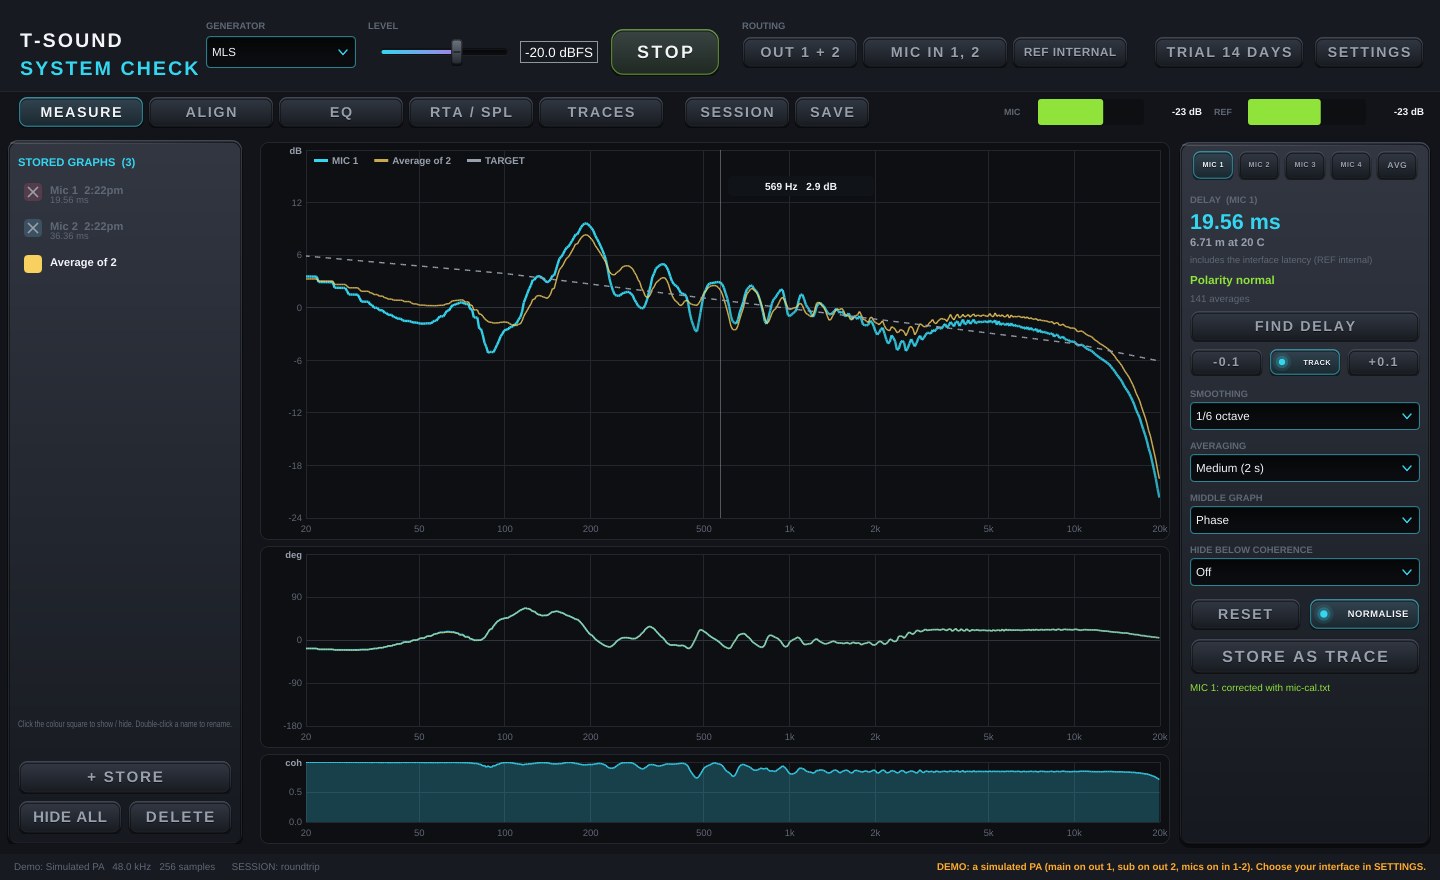
- A target curve loaded on the EQ page is drawn as a dashed line, level-matched to the measurement.
- STORE AS TRACE: keeps this measurement to compare (the list on the left and the TRACES page).
- Warnings on the graph (orange) say what is wrong and what to do:
- THE TEST SIGNAL CLIPS: lower the LEVEL.
- NO SIGNAL ON THE REF INPUT or REF IN … DOES NOT MATCH THE MIC: REF is on an input with no loop-back cable; choose REF INTERNAL and press START.
- MIC LEVEL VERY LOW: turn up the interface gain, and switch on +48 V for a condenser measurement mic.
- COHERENCE LOW: raise the LEVEL, move the mic away from walls, or measure when the room is quieter.
- SINE: one frequency only: a sine is playing; read it on RTA / SPL, or use pink noise for the whole response.
Impulse response and target curve
ALIGN: delay between speakers
- Put the mic where the sum should be best, such as FOH or the middle of the audience.
- Set OUT to the first speaker only (e.g. the main). Wait for the delay and a steady curve, then press STORE A.
- Set OUT to the second speaker only (e.g. the sub). Wait again, then press STORE B.
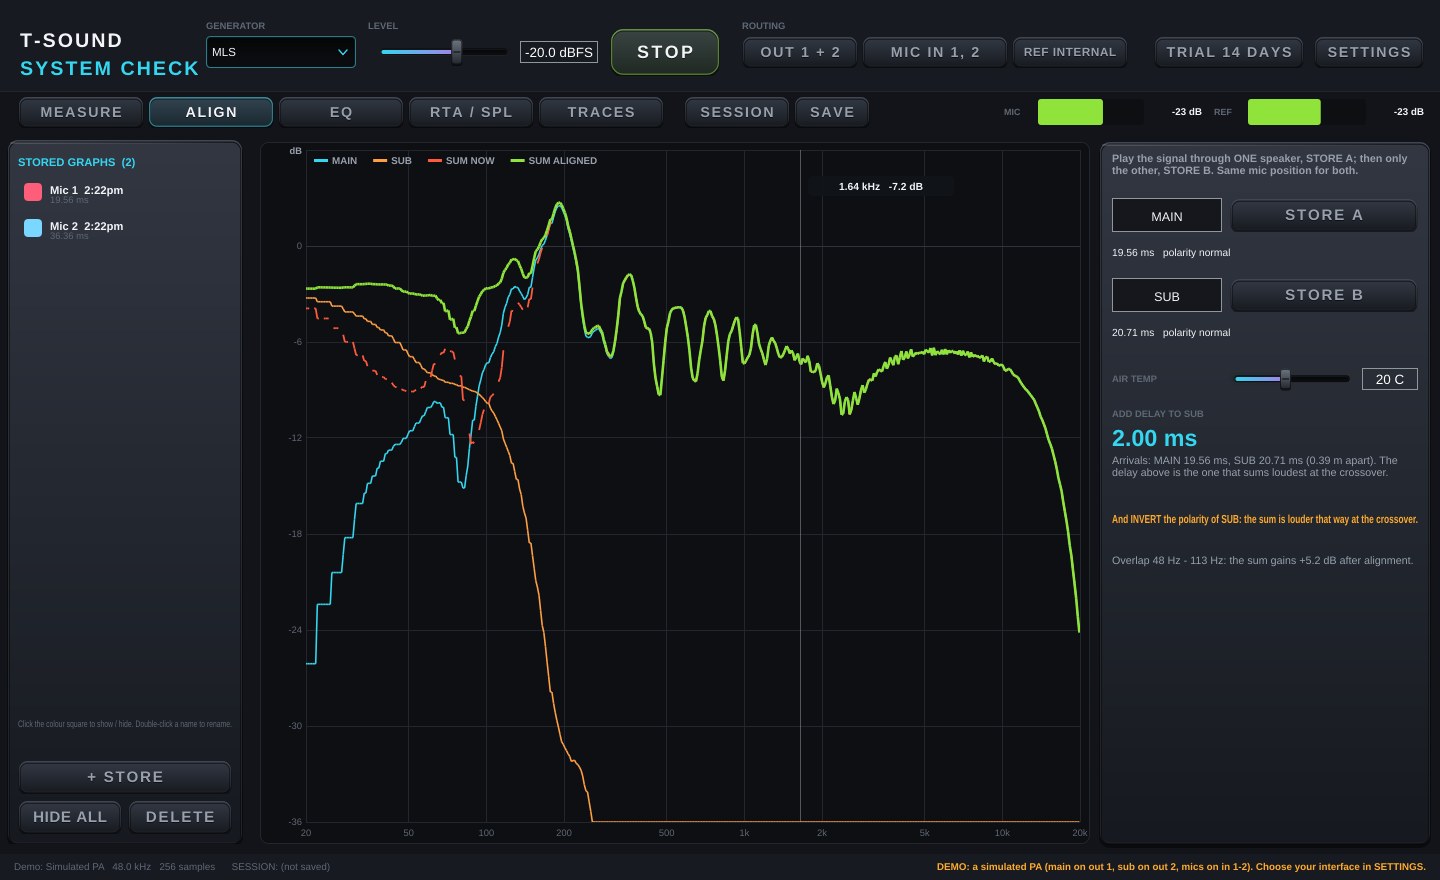
- The program tells you which speaker to delay and by how many ms, and whether to flip the polarity of one. It picks the setting that gives the loudest sum where the two overlap (the crossover region), not just the arrival times, because the crossover filters have their own phase.
- On the graph, SUM NOW (dashed red) is the sum as it is, and SUM ALIGNED (green) is the sum with the suggested setting.
- Name the speakers in the MAIN / SUB boxes. AIR TEMP is used to turn ms into metres.
EQ: suggested EQ
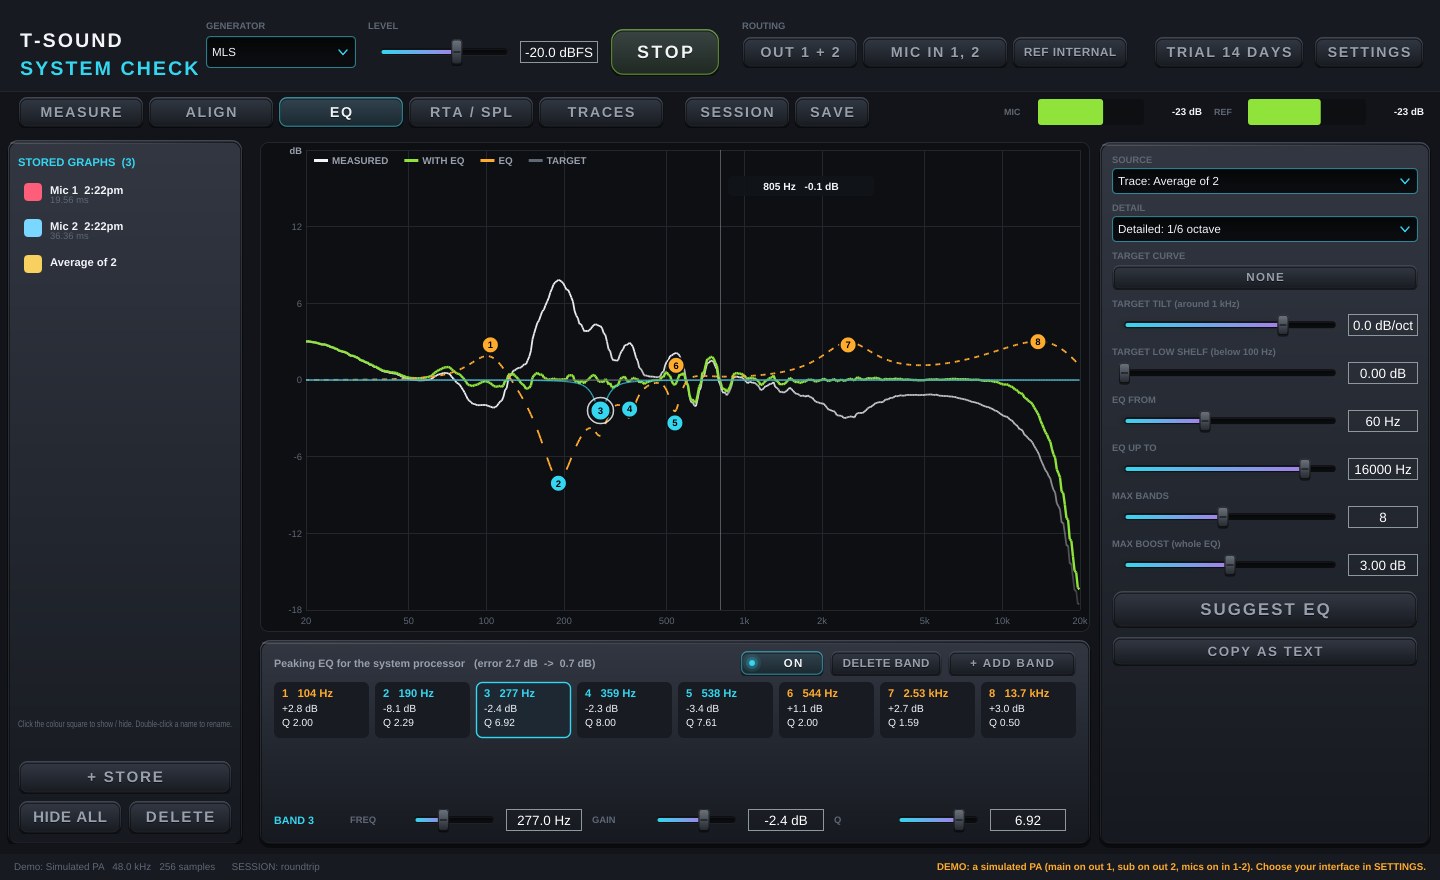
- TARGET CURVE: load a target (house curve) file with frequency and dB per line. The EQ aims for it, plus the tilt and shelf below; MEASURE draws it too. It is saved in the session.
- SOURCE: the measurement to use. Best is a trace averaged over several positions (4–6 places in the audience): EQ should fix what is the same everywhere, not one spot.
- TARGET TILT / LOW SHELF: the target curve; 0 is flat. Most live systems sound best with a gently falling top (−0.5 to −1 dB/oct) and more low end (a +3 to +6 dB low shelf).
- EQ FROM / UP TO: the frequency range to work on.
- DETAIL: how fine a shape the EQ follows. Broad 1/3 octave (recommended) fixes the overall tone. Detailed 1/6 and Fine 1/12 allow narrower bands and smaller corrections; use them on an average of several positions, because fine wiggles change from seat to seat.
- MAX BANDS (up to 16) and MAX BOOST: cuts may go to −12 dB, but the whole EQ never boosts more than this (+3 dB by default), and boosts stay wide (Q 2 at most). A narrow dip is usually a cancellation that EQ cannot fill.
- SUGGEST EQ: the graph shows the measurement (white), the EQ (orange) and the result with it (green), with a numbered point for each band and the band cards below: frequency, gain and Q. The error before → after is shown above the cards.
- Set each band yourself: click a band card or its point on the graph, then:
- drag the point: frequency and gain (hold Shift for fine moves);
- mouse wheel over it: Q (narrower / wider);
- FREQ / GAIN / Q below the cards: drag, or click the value and type an exact number;
- ON / OFF (or double-click the point), DELETE BAND, and + ADD BAND, which puts a new band where the result is still furthest from the target (within MAX BOOST).
The green result and the error update as you go. Pressing SUGGEST EQ again, or changing a setting on the right, starts a new suggestion.
- If the coherence is too low over most of the range, the program says so instead of suggesting an EQ: fix the measurement first.
- COPY AS TEXT: copies the bands that are on. Type them into a system processor, or in T-Sound Dynamic EQ open the preset menu and choose PASTE EQ FROM SYSTEM CHECK (up to 8 bands; with more it takes the 8 biggest). That works inside Signal Rack too.
RTA / SPL
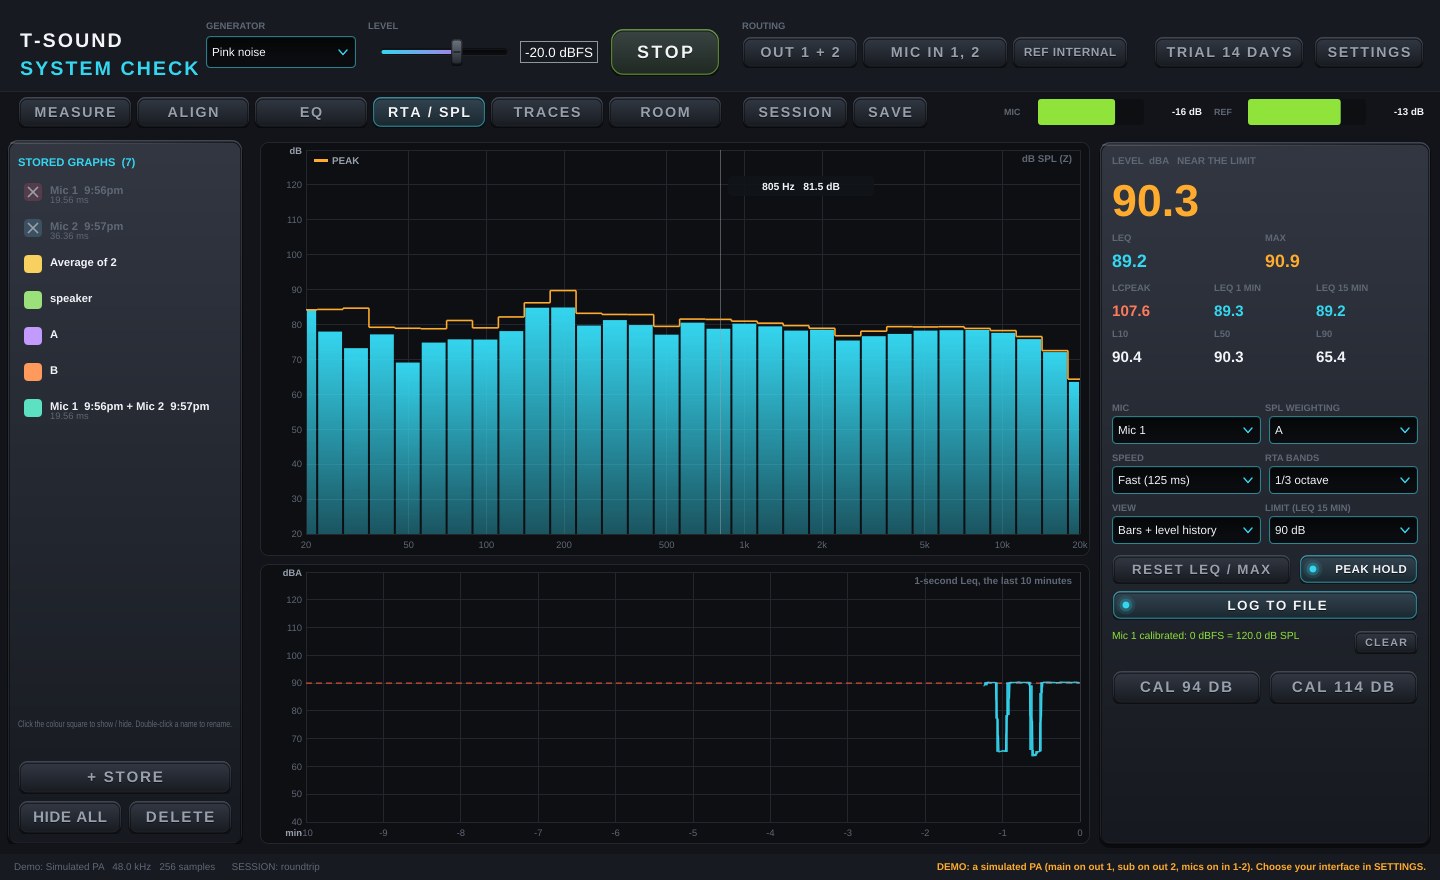
- RTA bars of the chosen mic in 1/1, 1/3, 1/6 or 1/12 octaves.
- LEVEL now, with LEQ (the energy average) and MAX. RESET LEQ / MAX starts them again, together with the statistics below.
- LCPEAK: the highest C-weighted peak, the figure noise rules quote next to the Leq.
- LEQ 1 MIN / LEQ 15 MIN: the energy average over the last minute and the last 15 minutes.
- L10 / L50 / L90: the level exceeded 10 / 50 / 90 % of the time. L90 is close to the background noise, L10 to the loud parts.
- SPL WEIGHTING A, C or Z, and SPEED Fast (125 ms) / Slow (1 s).
- VIEW: Bars, Bars + spectrogram (frequency across, the last 30 s downwards, colour = level; a feedback or ringing tone shows as a line) or Bars + level history (the 1-second Leq of the last 10 minutes).
- LIMIT (LEQ 15 MIN): 85 to 105 dB. The level turns amber within 3 dB of the limit and red above it, and the history draws the limit as a dashed line. It needs a calibrated mic (CAL).
- LOG TO FILE: writes one line a second (LZeq, LAeq, LCeq, LCpeak, LAeq 15 min) to a CSV file in Documents / T-Sound System Check, for a show report or for Excel.
- THD+N / THD: when the generator plays Sine or Sine burst, the distortion of the tone at the mic shows under the statistics. Room noise counts in THD+N, so measure close to the speaker at a healthy level.
- PEAK HOLD: keeps the highest level of each band as a line over the bars (RESET LEQ / MAX clears it).
- CAL 94 dB / CAL 114 dB: put a calibrator on the mic, switch it on and press the matching button. The readings turn into dB SPL. The calibration is kept on this computer, per mic. Press STOP first: CAL only accepts the calibrator's one steady tone, not the test signal or room noise.
- CLEAR (next to the calibration line): removes the mic's calibration, so the readings go back to dBFS.
ROOM: reverberation and clarity
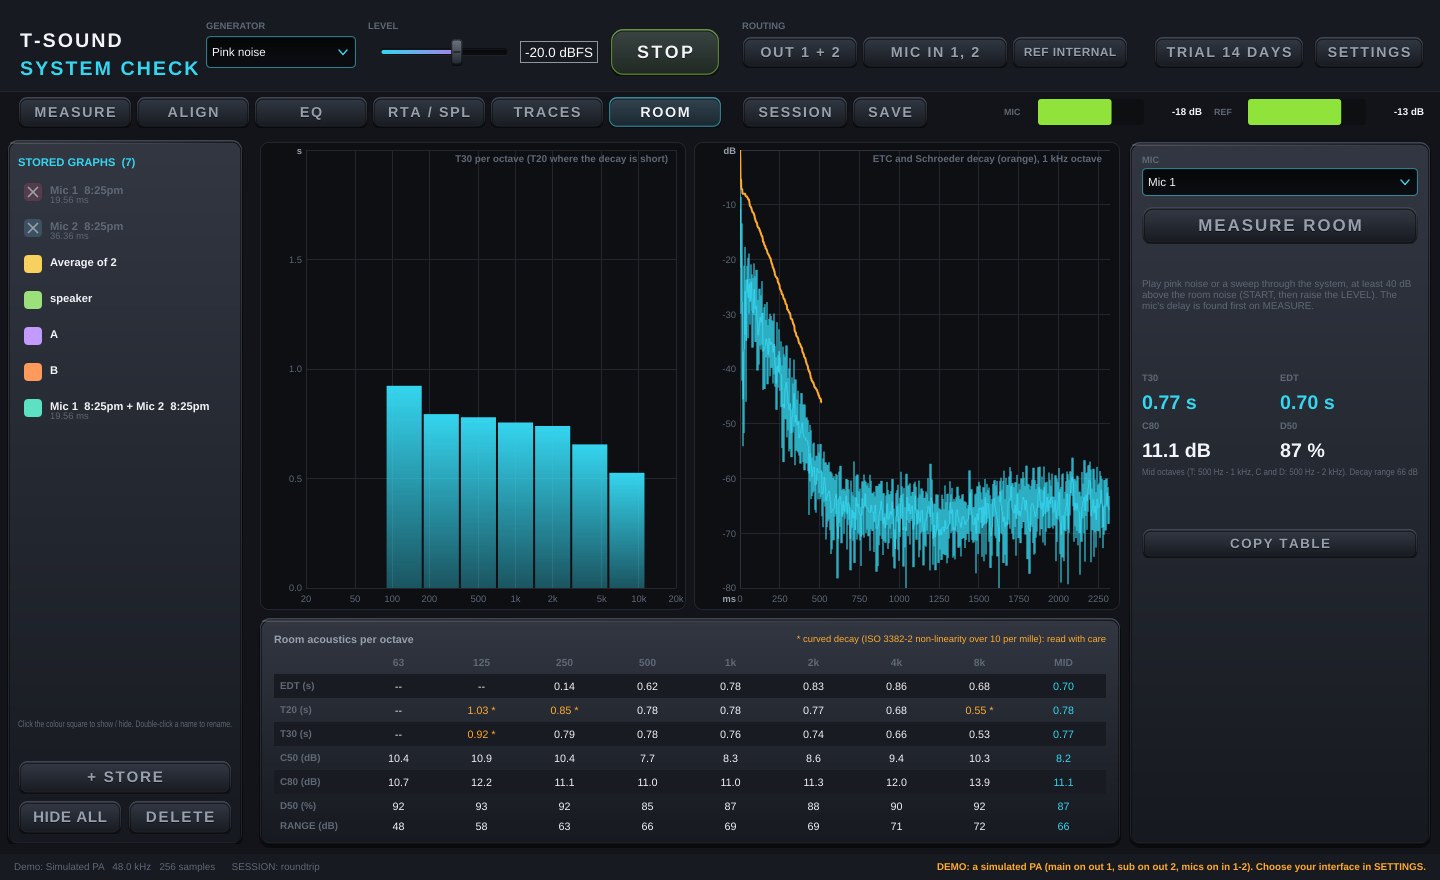
- Measures how the room itself sounds, with the same mic and test signal, per octave from 63 Hz to 8 kHz:
- T30: the reverberation time (the time to fall 60 dB, read over 5 to 35 dB down). T20 (5 to 25 dB down) when the decay is too short for T30.
- EDT: the early decay time (the first 10 dB), closest to the reverberance the ear hears.
- C50 / C80: clarity for speech / music, early sound against late sound, in dB.
- D50: definition, the share of the sound that arrives in the first 50 ms.
- Play pink noise or a sweep (START, at least 40 dB above the room noise), choose the MIC and press MEASURE ROOM. It takes about 12 s: keep the room quiet. CANCEL stops it. The mic's delay is found first, as on MEASURE.
- The numbers on the right are the usual single figures: T and EDT from the 500 Hz and 1 kHz octaves, C and D from 500 Hz to 2 kHz (the MID column of the table).
- The graph on the right is the 1 kHz octave: the ETC (energy over time) and the Schroeder decay (orange) that the times are read from.
- A value with a star (*, in amber) comes from a curved decay (ISO 3382-2 non-linearity over 10 per mille), for example a strong direct sound or two coupled spaces: read it with care. -- means there was not enough decay to measure: too little level, or a space with almost no reverberation. RANGE is how far the decay stood above the noise; T30 needs about 45 dB or more.
- COPY TABLE copies the table as text for a report or a spreadsheet. The result is saved with the session.
- A rough guide: rooms for speech 0.6 to 1 s, a concert hall 1.8 to 2.2 s; C50 above 0 dB helps speech, C80 of -2 to +4 dB suits music.
TRACES
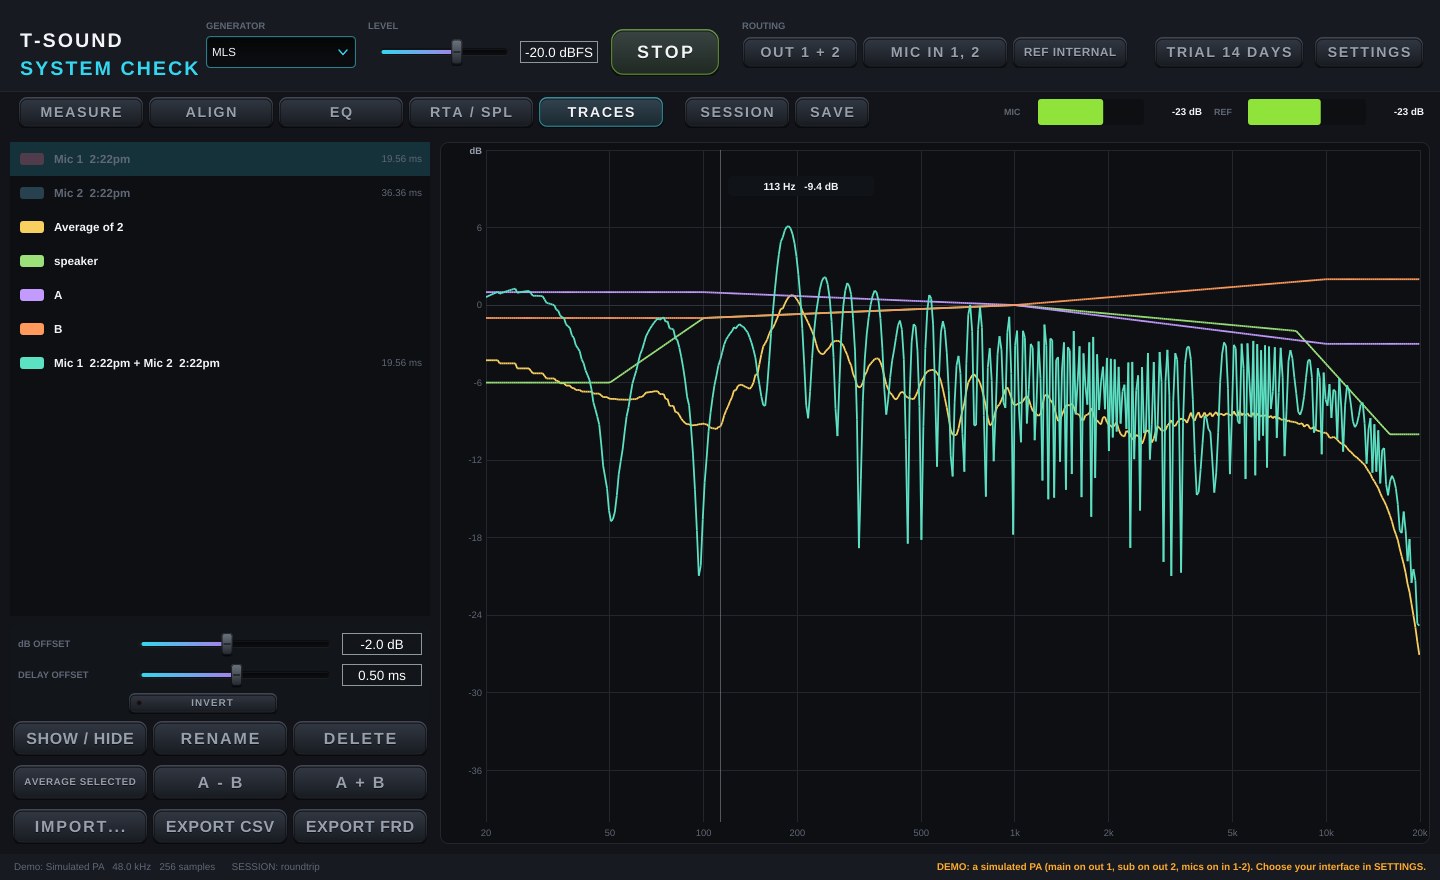
- The stored measurements (the same ones as the list on the left, which hides on this page). Click to select (Ctrl / Cmd-click for several); double-click to hide or show.
- SHOW / HIDE, RENAME, DELETE.
- Select one trace to set its dB OFFSET, DELAY OFFSET and INVERT (polarity). The trace is shown, summed and exported with them.
- A − B: select two traces (the upper one is A). This makes the difference, e.g. a measurement after EQ minus the one before.
- A + B: select two traces of two speakers measured one at a time at the same mic. This makes their sum as if they played together, including when each arrives (its delay plus any offset). Try a delay or polarity offset on one of them and watch the sum change before you touch the processor.
- IMPORT...: load a trace from a file (TXT, FRD, or a CSV exported by System Check); EXPORT FRD: save the selected trace for speaker-design or room programs.
- AVERAGE SELECTED: averages the selected traces (e.g. 4–6 positions) into a new trace, the best SOURCE for EQ.
- EXPORT CSV: every trace (frequency, dB, phase, coherence) for Excel.
- Visible traces are drawn over the MEASURE graph too.
Measuring tips
- Put the mic at ear height on a stand, away from walls and hard surfaces. Never hold it in your hand.
- The test signal should be at least 10 dB above the room noise; coherence near 1 tells you it is.
- Measure several positions and average them before you decide on EQ. Do not fix a narrow dip that only one spot has.
- Align the delays (ALIGN) first, then EQ the summed system.
- During a show, set REF to an input with a loop-back from the console and watch the system with the music, no noise needed.
- For ROOM, put the mic out in the room, away from the speakers. Close to a speaker the direct sound rules and EDT, C80 and D50 describe the speaker more than the room.
Licence and trial
Every feature works for a 14-day trial. When the trial ends without activation, the generator and the measurements stop, but stored traces and saved sessions still open. Buy a licence at tsoundman.com, click the TRIAL badge at the top right, enter the licence key (it starts with FK2-) and press Activate.
If activation fails
- The key window has Paste code from clipboard (pastes the key you copied) and Load key file... (picks a .txt file containing the key).
- Spaces or odd characters that come along with a key from LINE or e-mail are removed for you.
- No licence code: the key box is empty. Copy the key again and press Paste code from clipboard, or save the key in a text file and use Load key file...
- Could not connect to the licence server: check that the computer is online, then try again.
- Invalid licence code: the key must start with FK2- and must belong to this product (keys do not work across products). If it still fails, send a screenshot on LINE and we will check it or issue a new key.