This guide shows how to connect T Sound Man's AI feedback suppression to a Behringer X32, Midas M32 or Behringer WING digital mixer with a single USB cable. It covers
- Feedback Killer AI 16CH and AI 8CH (stand-alone apps for Windows / Mac, no DAW needed)
- the Feedback Killer AI plug-in (VST3 / AU) running in Signal Rack or another host
- the AI 8CH / AI 16CH apps on iPad and Android tablets, and AI 4CH on iPhone and Android phones
Quick start: one-page cards
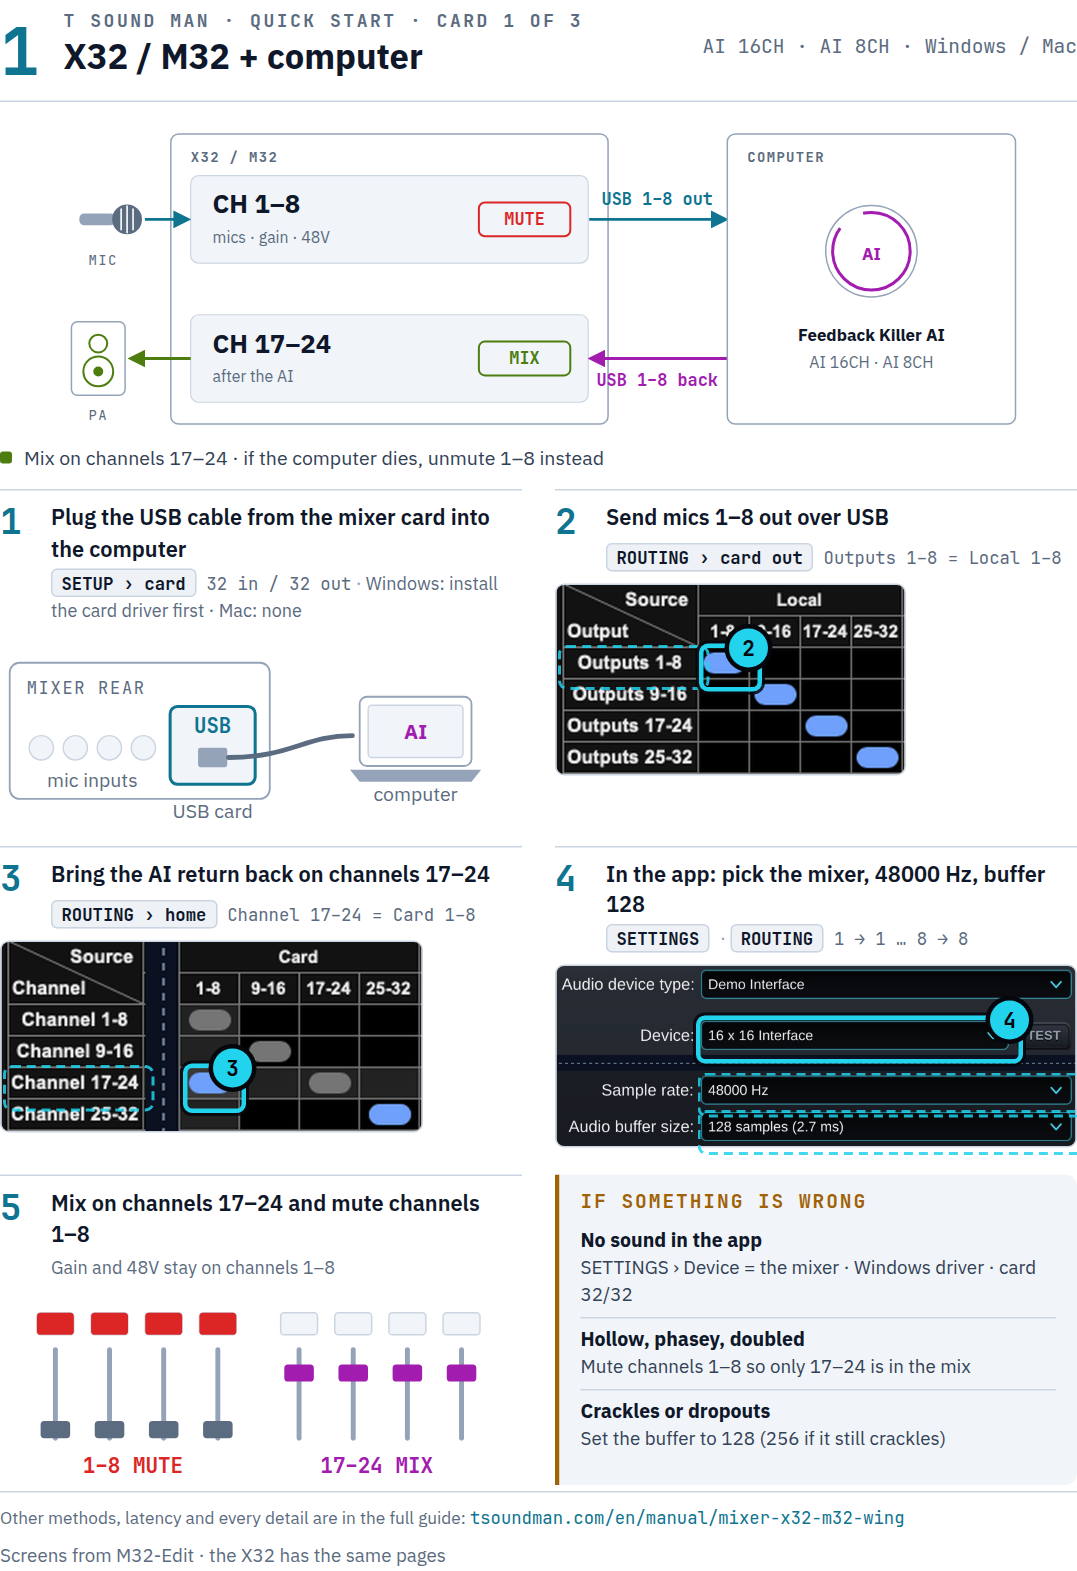
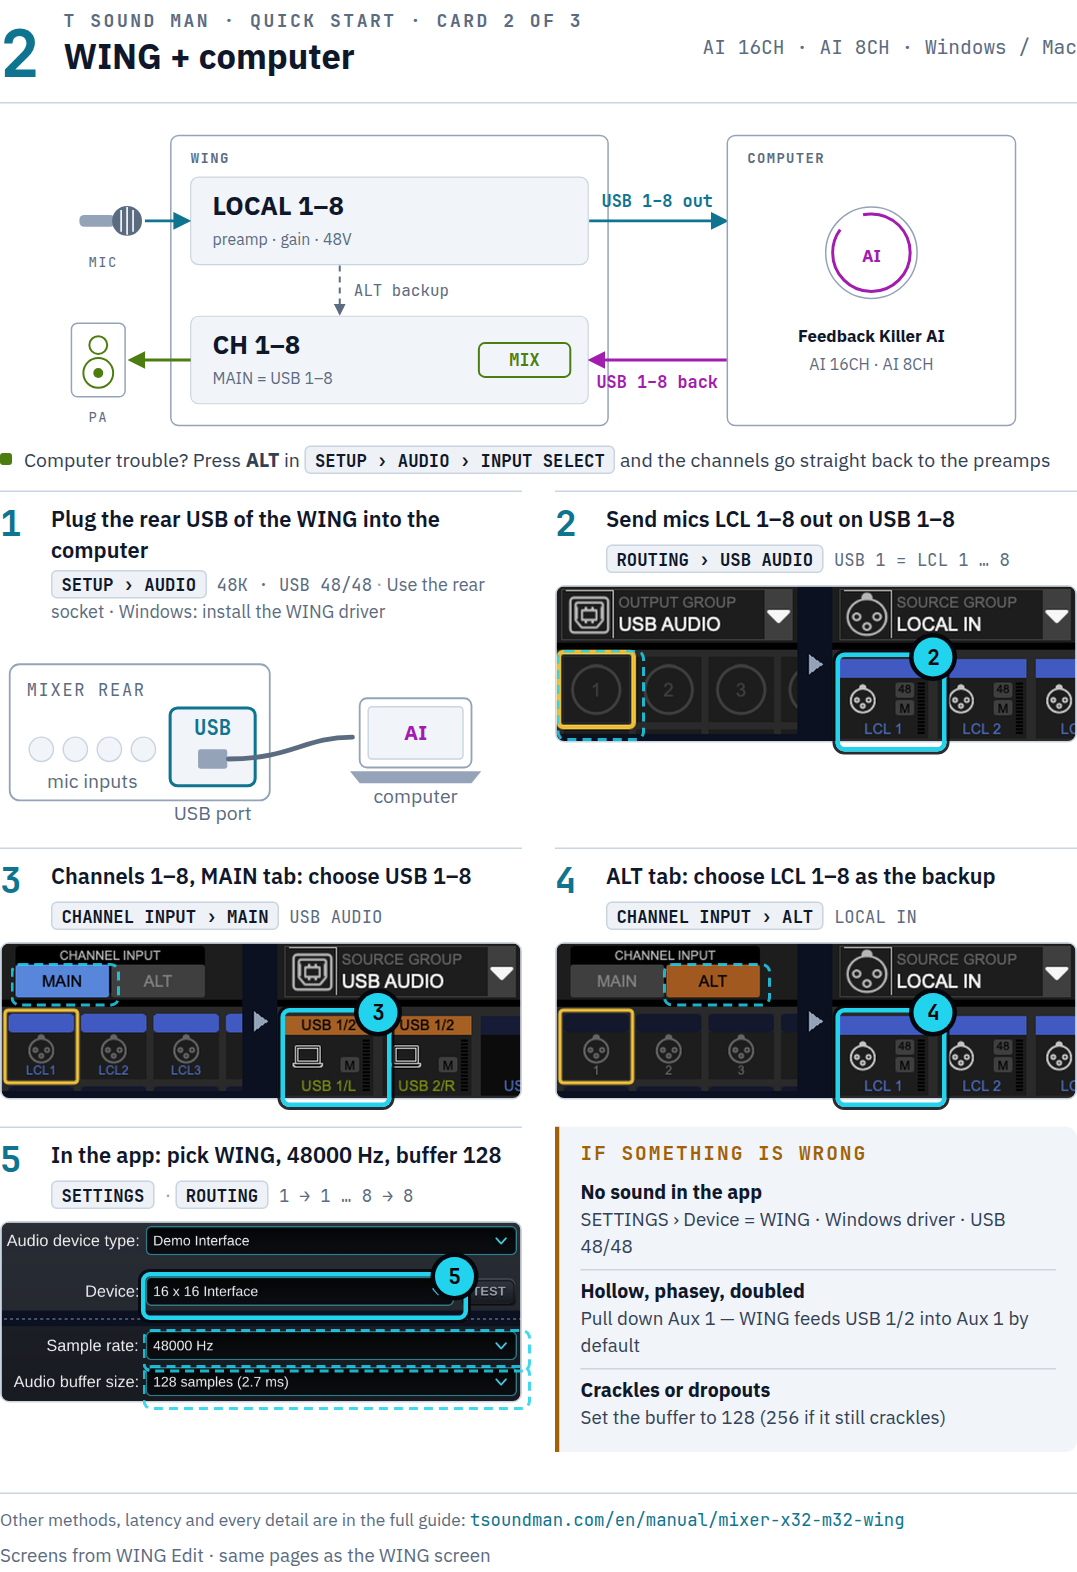
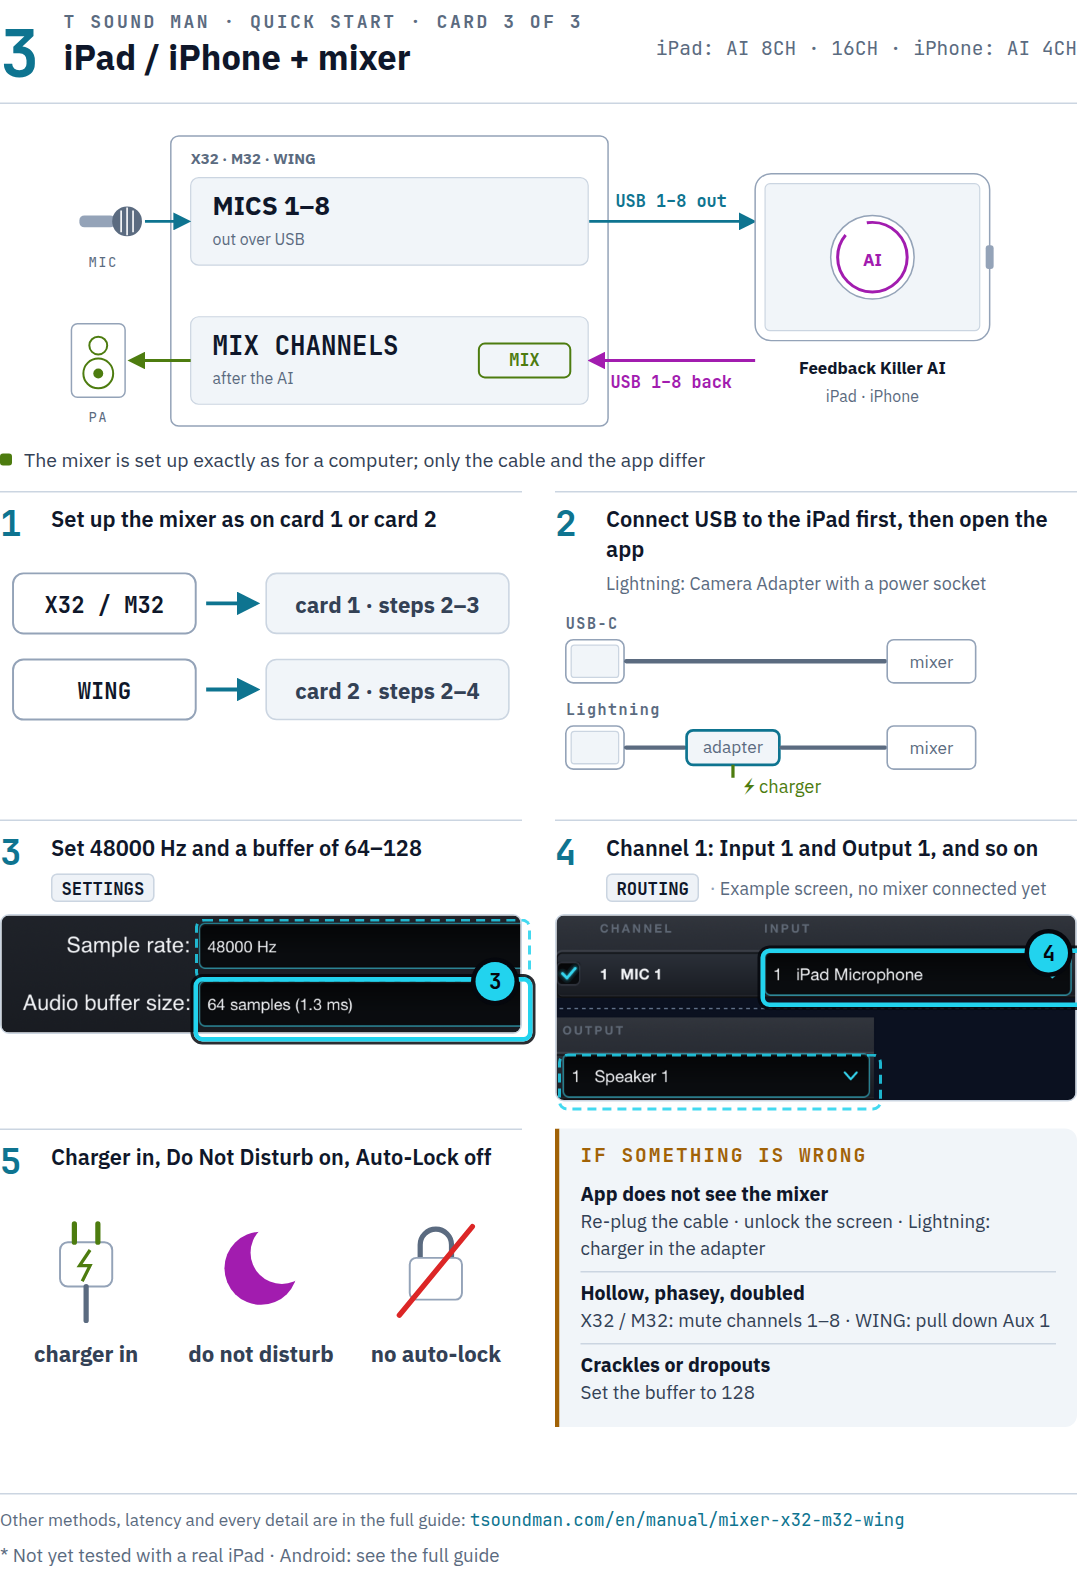
To get going fast, open the card for your mixer and follow its 5 steps (download the 3 cards as PDF). Every detail and the other methods are further down.
X32 / M32 + computer
WING + computer
iPad / iPhone + mixer
The idea: send the mic to the AI and take it back
The mic signal travels like this: mic → mixer preamp → USB to the computer or iPad → AI removes the feedback → USB back to the mixer → the channel you mix with → PA. One USB cable carries dozens of channels in both directions at once.

- Our AI adds no latency of its own (zero latency). What you add is the USB round trip of the mixer's audio interface, usually about 5–9 ms at a 64-sample buffer (see "Latency").
- The AI is made for vocal and speech mics. There is no need to send instrument mics through it.
What you need
- X32: a USB card in the rear slot, X-USB or X-LIVE (32 in / 32 out). Most X32s sold in recent years ship with an X-LIVE.
- M32: a DN32-USB or DN32-LIVE card (32 in / 32 out).
- WING / WING Compact / WING Rack: built-in USB audio, 48 in / 48 out, no card needed. Use the USB-B socket on the rear; the USB-A socket on top is for memory sticks only.
- A good USB 2.0 cable, as short as practical (5 m maximum): USB-B on the mixer side, USB-A or USB-C on the computer side.
- Computer: Windows 10/11 64-bit or macOS 10.13 or newer. A 4-core CPU or better is recommended for 16 channels. Use the machine only for audio during the show.
- Windows drivers: X32 uses the X-USB ASIO driver from behringer.com, M32 uses the DN32 card driver from midasconsoles.com, WING uses the WING USB driver from behringer.com (get the latest from that model's Downloads page). Do not use ASIO4ALL or Realtek drivers.
- Mac drivers: none needed. All three are class compliant: macOS recognises them through Core Audio.


Choose a method
Both use the same USB cable. They differ in where the processed sound comes back.
Method A: insert on the same channel
The mic channel sends its signal from its insert point to the AI and takes it back at the same point, before the EQ, compressor and fader.
- Pros: uses the existing channel; switching the insert off returns to the dry sound instantly.
- Limits: X32 / M32 manage up to 6 mics (Aux 1–6 act as the insert points), and Aux In 1–6 cannot be used for anything else. WING needs an external insert in an FX slot (uses an effects slot and is harder to set up).

Method B: processed sound on a second channel (recommended for live shows)
The mic goes out over USB straight from the preamp, and the processed sound comes back on a new channel. You mix with the new channel, for the PA and the monitors.
- Pros: all 8 or 16 mics, simple to set up, the AI sits before every EQ and compressor on the channel, and there is a fallback: if the computer stops, bring up the original channel in a second.
- Limits: needs one extra channel per mic (an X32/M32 has 32 channels, so 16 mics + 16 processed channels fill it exactly). Never leave both channels up: the doubled signal sounds hollow (phasey).
- WING does even better: a single channel takes its MAIN source from USB (processed) and its ALT source from the preamp, and one switch flips between them, so no extra channels are needed.

X32 / M32 setup
The example uses 8 vocal mics on Local 1–8 (channels 1–8). For 16 mics repeat with the next block: the mixer routes in blocks of 8.
1. Card and clock
- Press SETUP, open the card tab and set 32 in / 32 out.
- With an X-LIVE / DN32-LIVE card, set the card to take its returns from USB (not from the SD cards), or the processed sound will not come back.
- On the SETUP config tab set Sample rate = 48K and Synchronization = Internal. The mixer is the master clock; the card and the computer follow it.
2. Method B: preamps out over USB, back on channels 17–24
- Press ROUTING, card out tab: set Outputs 1–8 = Local 1–8 (many mixers already have this). This sends the signal straight after the preamp, before the channel.
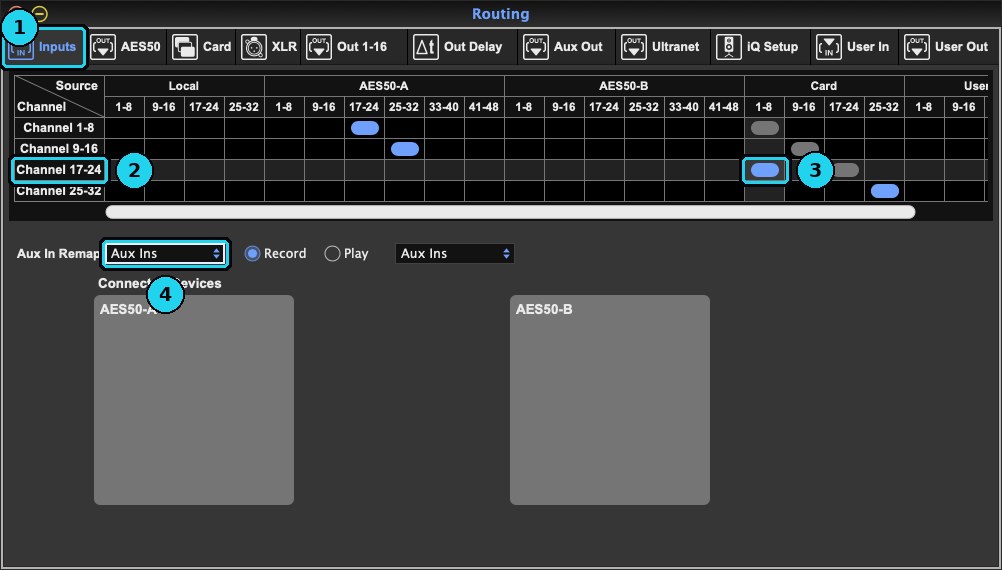
- home / inputs tab: set Channel 17–24 = Card 1–8, so channels 17–24 receive the processed sound.
- On channels 1–8 set gain and 48V as usual (the mic's gain control lives on this channel), then pull the fader down, take it out of Main LR and mute it.
- Mix with channels 17–24: name them (e.g. VOX 1 AI) and put the EQ, compressor and monitor sends on these channels (Copy / Paste copies the settings from the original channel).
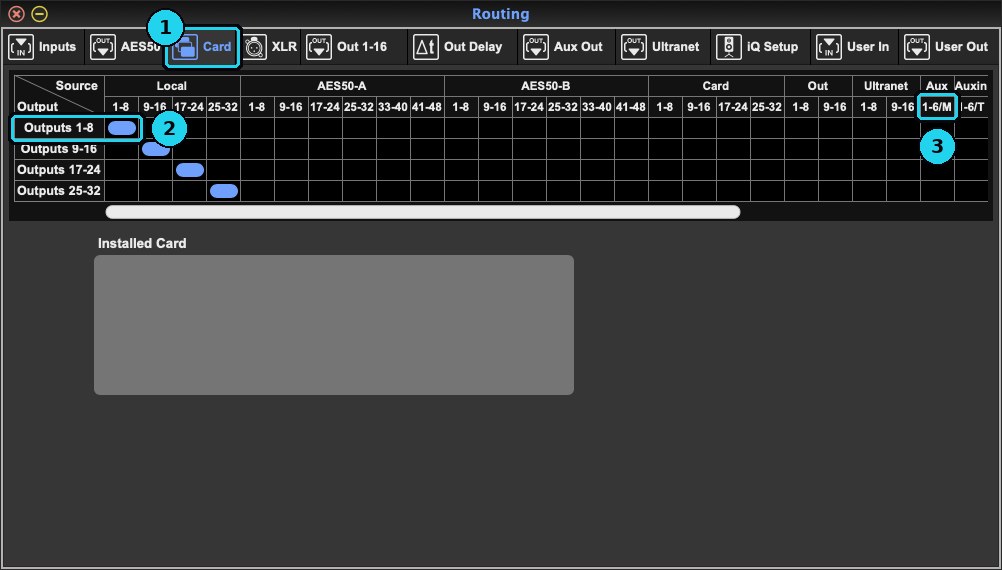
3. Method A: insert through Aux 1–6 (up to 6 mics)
- ROUTING › home / inputs: set Aux In Remap = Card 1–6 (processed sound from USB 1–6 comes back on Aux In 1–6).
- ROUTING › card out: set Outputs 1–8 = Aux 1–6 / Mon (Aux Out 1–6 go out on USB 1–6).
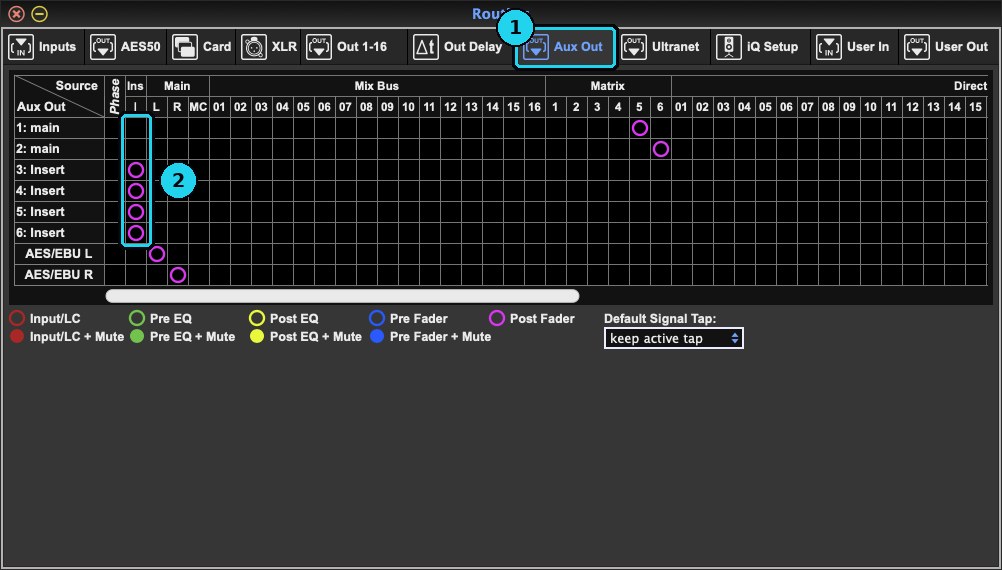
- ROUTING › aux out: set each Aux you use to Insert.
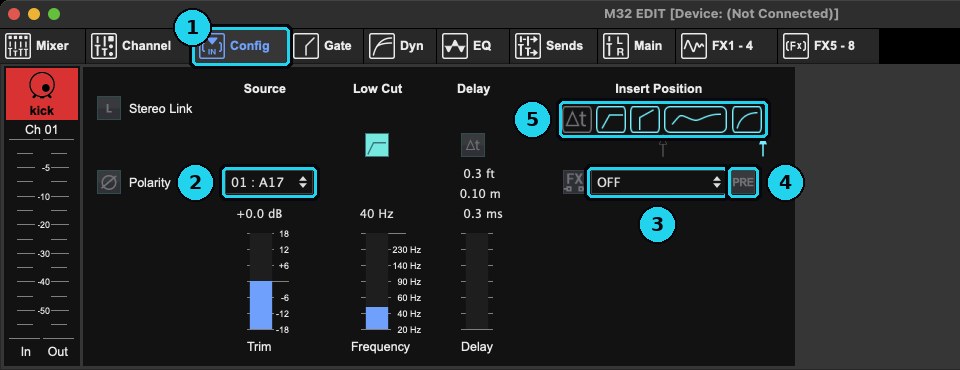
- On the mic channel open Config: under Insert choose AUX 1 (the second mic AUX 2 …), set PRE and switch the insert on.
- Keep the Aux In 1–6 channel faders down so the sound is not doubled in the mix.
- In the app, the mic inserted on AUX 1 uses Input 1 / Output 1, AUX 2 uses Input 2 / Output 2, and so on.
WING setup
The example uses 8 mics on Local 1–8, channels 1–8.
1. USB and clock
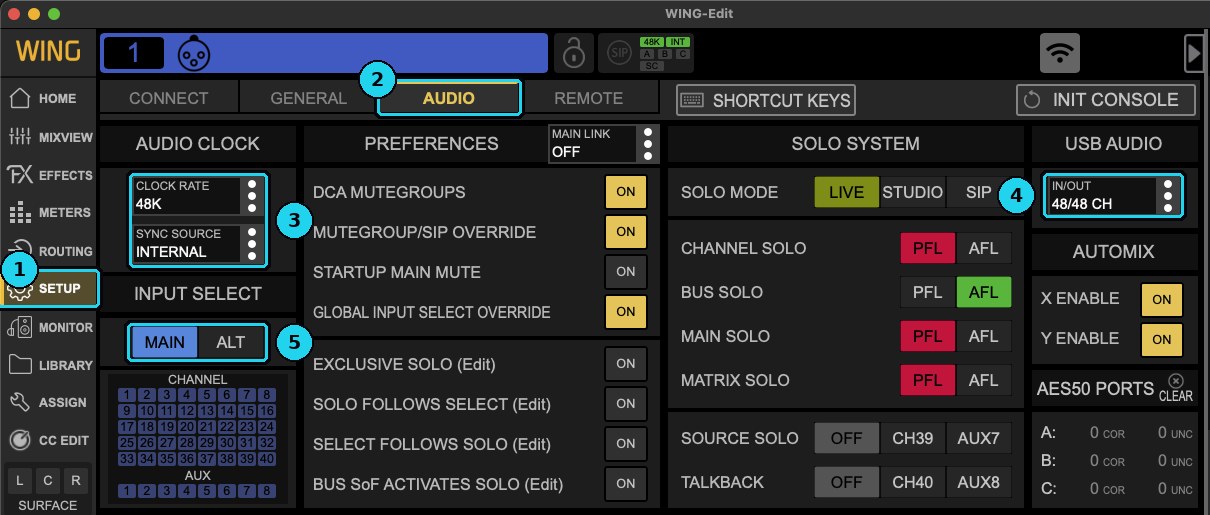
- Tap SETUP › AUDIO.
- AUDIO CLOCK: clock rate 48K, sync source INTERNAL (the mixer is the master clock).
- USB AUDIO IN/OUT: 48/48, or just what you need (e.g. 16/16).
2. Preamps out over USB
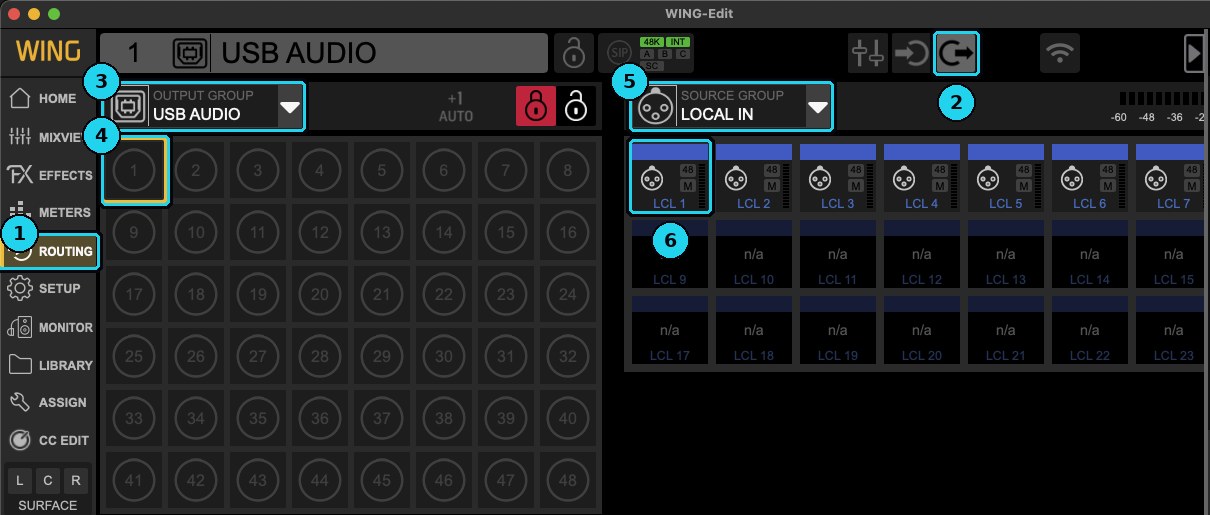
- Tap ROUTING, then the outputs icon (arrow pointing out) at the top.
- OUTPUT GROUP = USB AUDIO, then tap slot USB 1.
- SOURCE GROUP = LOCAL IN, then tap LCL 1. Continue until USB 2–8 = LCL 2–8 (with +1 AUTO on, the next slot is selected for you).
3. Channel takes the processed sound (MAIN) and keeps the preamp as a backup (ALT)
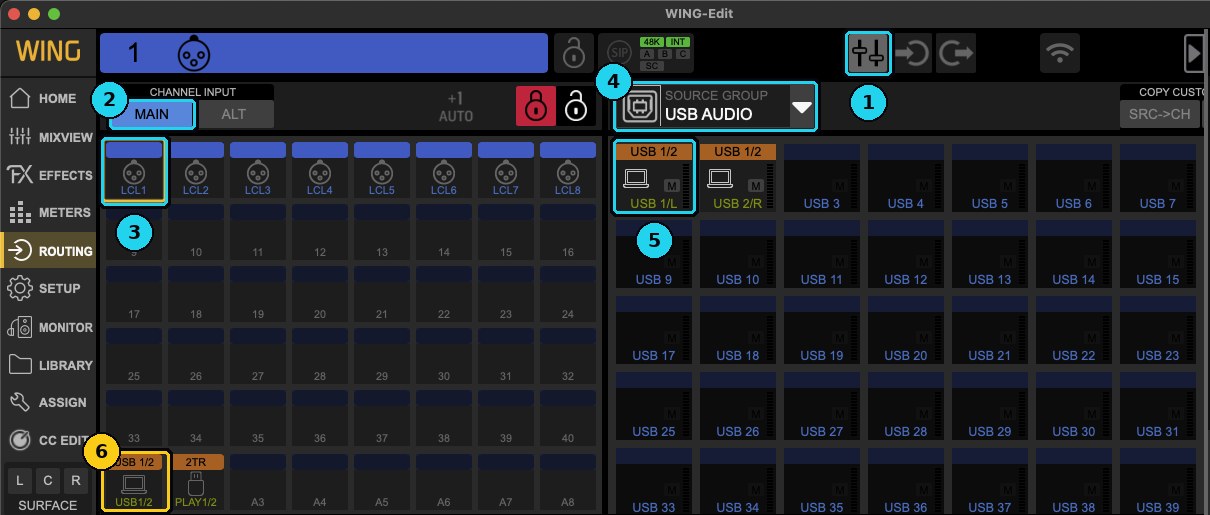
- In ROUTING tap the channel input icon (fader symbol), select channel 1, tab MAIN.
- SOURCE GROUP = USB AUDIO, then tap USB 1. Continue: channels 2–8 = USB 2–8.
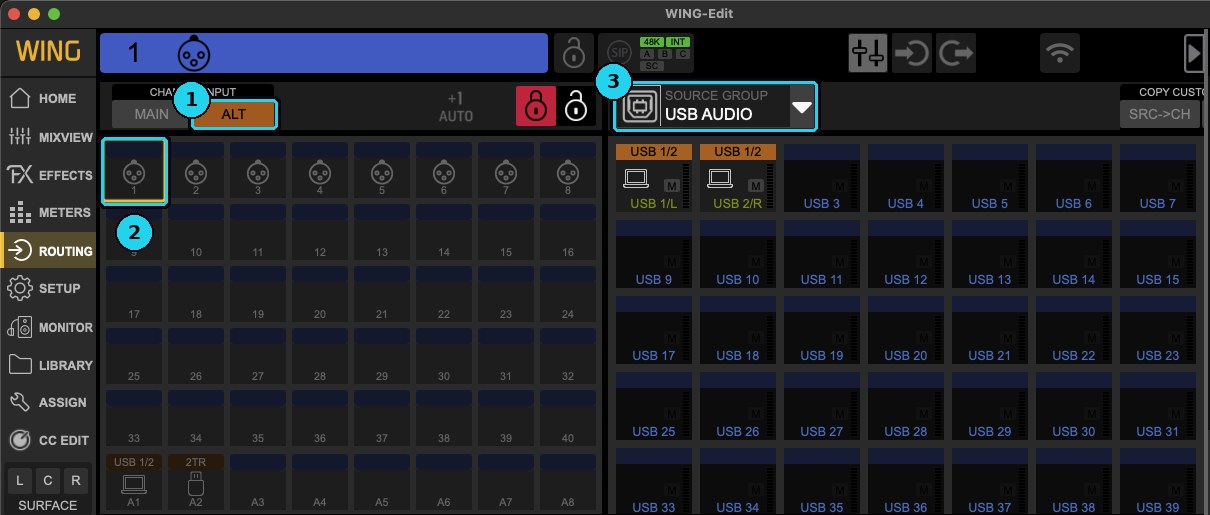
- ALT tab of the same channel: SOURCE GROUP = LOCAL IN, tap LCL 1 (channels 2–8 = LCL 2–8).
- SETUP › AUDIO › INPUT SELECT: choose MAIN for the show. If the computer has a problem, press ALT and the channels go straight back to their preamps.
- Watch out: by default WING patches USB 1/2 to Aux 1. If you use USB 1–2 for returns, set Aux 1's source to OFF or keep its fader down, or you will hear the sound twice.
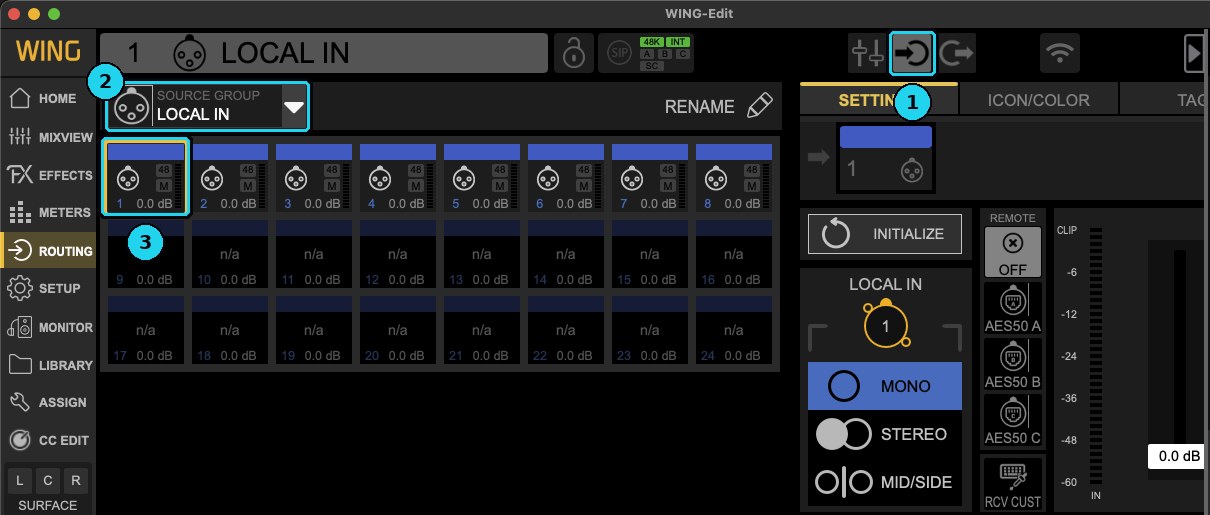
- Mic gain: while a channel listens to USB, its gain control only trims the USB signal. Set the preamp gain / 48V at ROUTING › input page (LOCAL IN › LCL 1), or switch to ALT while you set gain.

App settings on the computer (AI 16CH / AI 8CH)
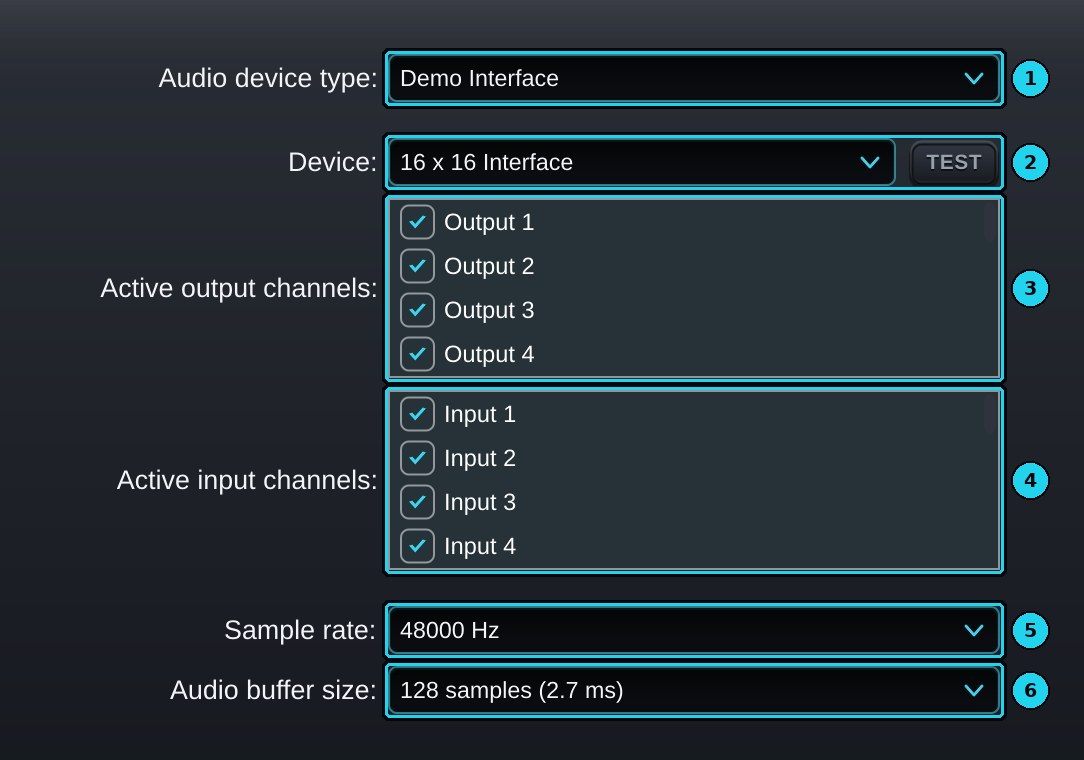
- Connect the USB cable, then open the app. On first start it picks an audio device for you.
- Press SETTINGS.
- Audio device type: ASIO on Windows / CoreAudio on Mac.
- Device: your mixer (named X-USB, X-LIVE, DN32 or WING depending on the driver).
- Active input / output channels: tick only the channels you use, e.g. Input 1–8 and Output 1–8.
- Sample rate: 48000 Hz (same as the mixer).
- Audio buffer size: start at 128 samples; if there are no clicks, try 64.
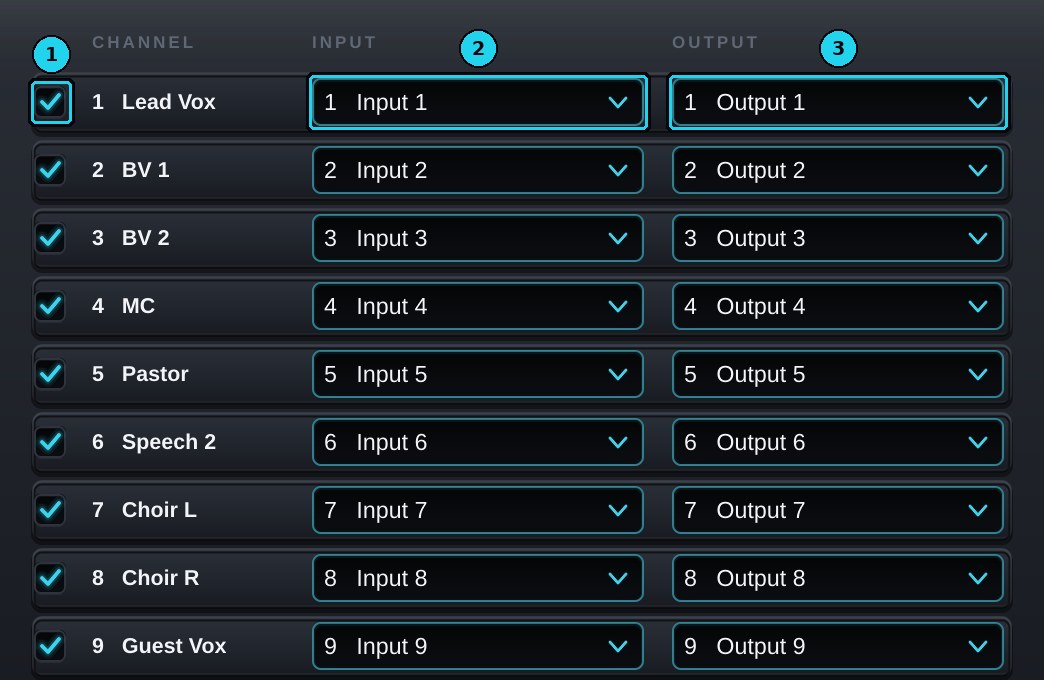
- Press ROUTING, tick the channels you use, set Input = the USB channel carrying that mic and Output = the USB channel going back (Method B above: channel 1 Input 1 → Output 1 … channel 8 Input 8 → Output 8).
- Name the channels after the mics, check that every AI button shows WORKING, then press SAVE.
Using the plug-in in Signal Rack or another host
The mixer side is exactly Method A or B; the host simply replaces the AI 16CH app.
- In Signal Rack choose the mixer as the audio device (Windows: ASIO), 48 kHz, buffer 64–128.
- Make one column per mic: input = that mic's USB channel, output = the USB channel going back.
- Put Feedback Killer AI in the first slot of the column and press its AI button.
- Signal Rack hosts VST3 plug-ins; other hosts can use VST3 or AU. The plug-in adds no latency.

iPad, iPhone and Android tablets
- AI 8CH / AI 16CH run on iPad and Android tablets; AI 4CH runs on iPhone and Android phones.
- The mixer side is the same as with a computer (Method A or B, MAIN / ALT on WING).
Cables
- iPad with USB-C: a USB-C → USB-B cable straight to the mixer. For long shows use a USB-C hub with power pass-through (USB-C PD) and a charger so the iPad charges while it runs. Test the hub at home before the gig.
- iPad with Lightning: use the Lightning to USB 3 Camera Adapter (the one with a power socket), keep a charger plugged into it, then a USB-A → USB-B cable to the mixer. The older adapter without a power socket often refuses audio devices.


App settings
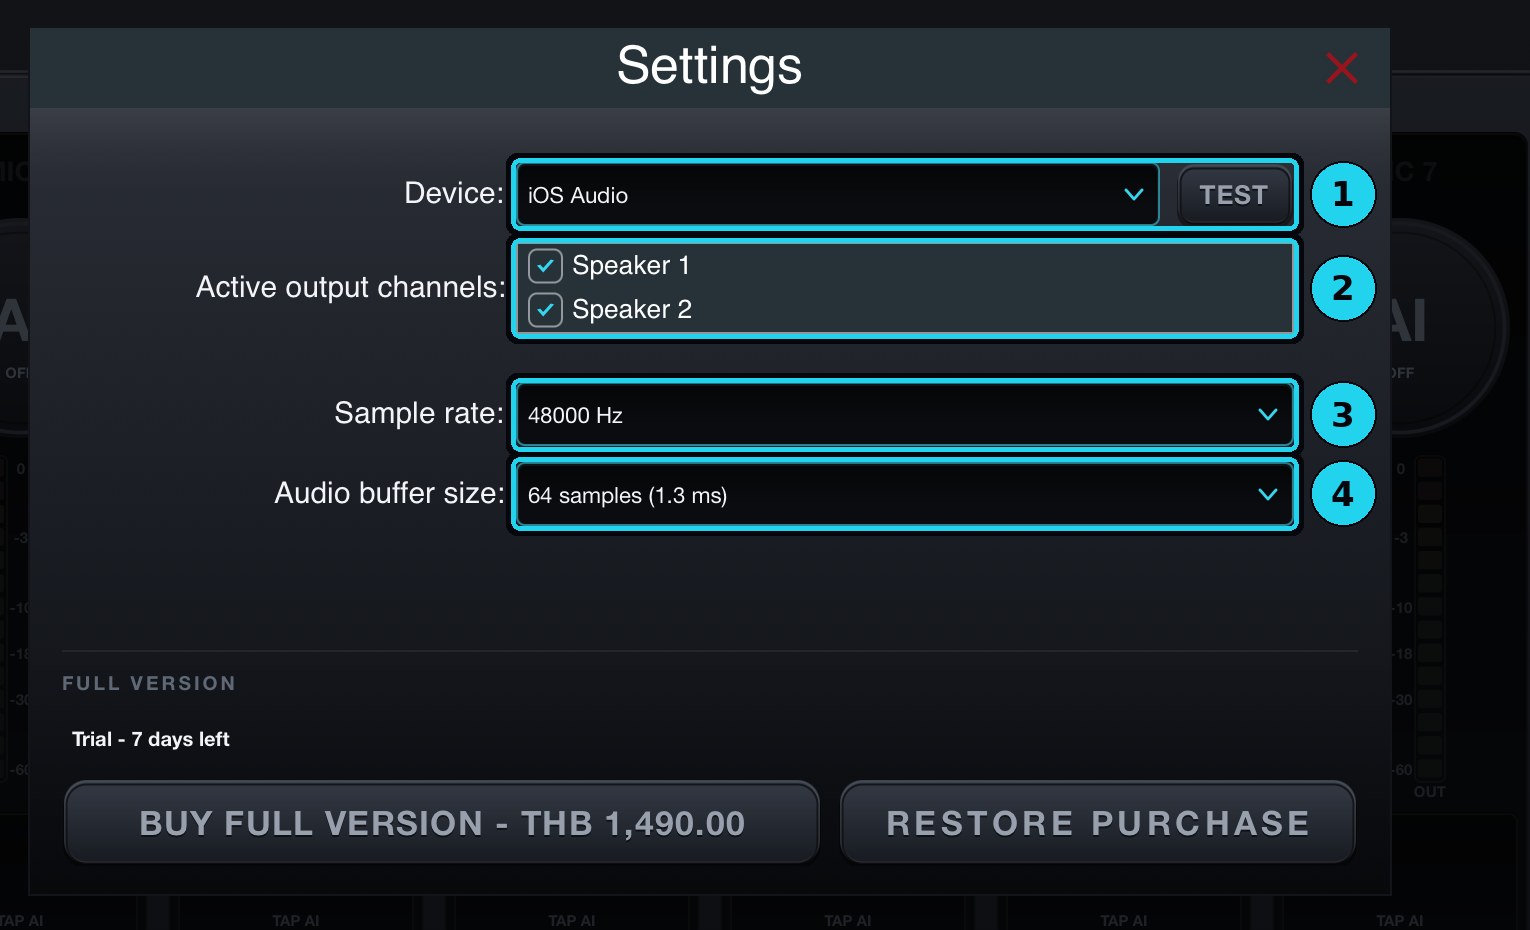
- Connect the cable first, then open the app. The app uses the audio device iPadOS has selected; when the mixer is plugged in, iPadOS switches to it.
- SETTINGS: check sample rate 48000 Hz, buffer 64–128 samples, and tick the outputs you use.
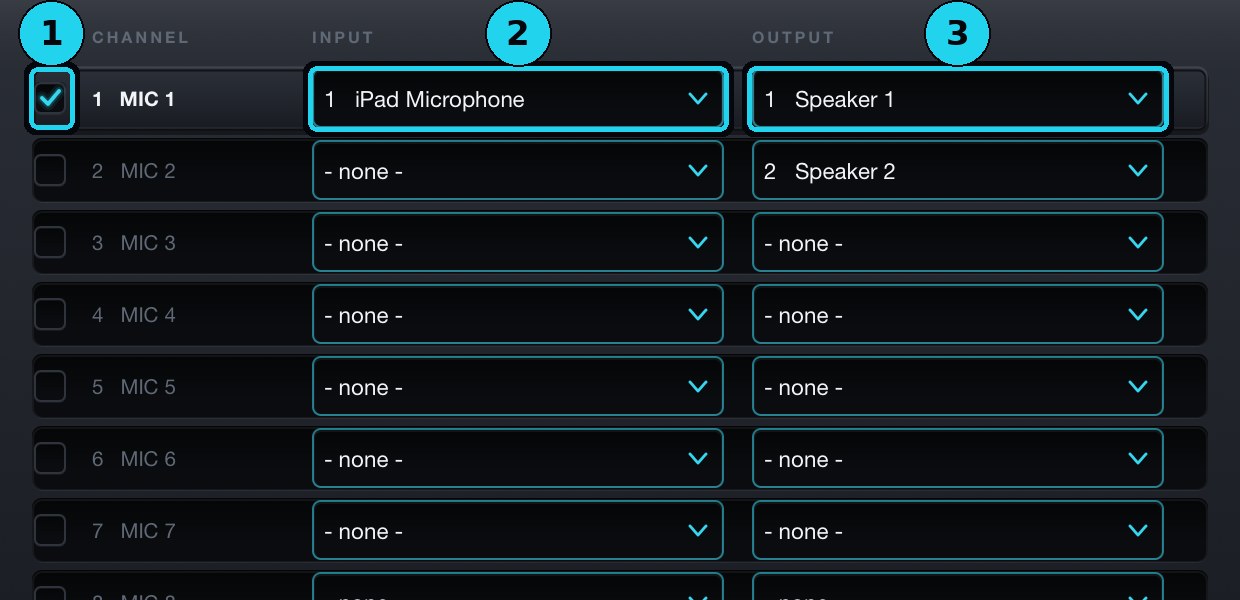
- ROUTING: tick the channels and choose Input / Output from the mixer's USB channels, as on a computer.
- The bottom-left status line shows sample rate, buffer and RT latency (in samples; divide by 48 for milliseconds).
Before the show
- Turn off Auto-Lock: Settings › Display & Brightness › Auto-Lock › Never (the app already keeps the screen on; this is a second safety).
- Turn on Do Not Disturb / Focus so no notification pops up during the show, and close other audio apps.
- To stop anyone leaving the app, use Guided Access (Settings › Accessibility › Guided Access), then triple-click the side or Home button to lock the iPad to the app.
Android tablets and phones
- Android 8 or newer with USB audio (class compliant) support on the USB-C / OTG port.
- Support varies a lot between brands and models. Some devices show only 2 channels or do not see the mixer at all. Test with the real mixer before relying on it (the 7-day trial is there for that).
- Some brands need OTG switched on in Settings and the app's battery setting on "unrestricted / allow background activity".
Latency
- T Sound Man's AI adds 0 ms. All the delay comes from the USB interface and the buffer size.
- The X32 / M32 USB cards measure roughly 5–7 ms round trip on Windows (ASIO) and 8–9 ms on a Mac at 48 kHz and 64 samples; 128 samples adds about 2.7 ms (user measurements; they depend on the computer and driver).
- Your own figure is in the app's status line at the bottom ("RT latency" in samples; divide by 48 for milliseconds).
- Front-of-house speakers and wedges are fine with this much delay. Some singers notice it in in-ear monitors. In-ears cannot cause feedback, so you can feed them from the raw mic channel (Method B: don't mute the raw channel; keep its fader down and out of Main LR, and use only its pre-fader sends to the in-ear mixes).
Gain staging and a quick test
- Set the mic gain on the mixer so normal singing sits around -18 dBFS and peaks stay below -6 dBFS. The USB card sends the same level the mixer meters show, so the app's IN meter should read about the same.
- Talk or clap into mic 1: the raw channel meter moves → the app's channel 1 IN and OUT meters move → the channel you mix with (e.g. 17) moves.
- Mute the channel you mix with: the sound must disappear from the PA (proof that the PA gets the processed channel).
- Check that the AI button shows WORKING, then slowly raise the PA or monitor towards feedback. The AI cuts that frequency (pink line on the RTA, pink channel frame) before the howl gets loud.
- Press BYPASS in the app: the sound still passes (no silence). Use it to check whether a sound problem comes from the app.
Troubleshooting
- No signal in the app: check the Device, that the inputs are ticked in SETTINGS, that the card is 32 in / 32 out (WING: USB 48/48), and that card out / USB out takes the mic's Local input.
- Signal reaches the app but not the mixer: check the outputs in the app's ROUTING, that the mixer channel takes the same Card / USB number, and that an X-LIVE / DN32-LIVE takes its returns from USB, not SD.
- Wrong channels (mic 2 comes out on channel 3): count the same numbers in all three places: card out on the mixer → Input / Output in the app → source of the return channel.
- Clicks, crackles or dropouts: raise the buffer to 128 or 256 / plug the cable straight into the computer, not a hub / use a shorter cable / Windows: High performance power plan and USB selective suspend off / Mac: keep the charger connected / close other programs.
- Hollow, phasey or doubled sound: the raw channel and the processed channel are both in the mix (Method B), Aux In 1–6 are up (Method A), or WING's Aux 1 is playing USB 1/2. Keep one path only.
- Feedback still happens: the AI button must show WORKING (not BYPASS / OFF) / the PA must come from the processed channel, not the raw one / the howling mic must be in the app / a speaker pointing straight into a mic or extreme gain is beyond what any processor can fix — position the speakers well too.
- Mac: no input at all: allow the microphone for the app in System Settings › Privacy & Security › Microphone, restart the app, and check in Audio MIDI Setup that the mixer runs at 48000 Hz.
- Windows: the mixer is not in the ASIO list: install that model's driver before connecting, then restart / in SETTINGS choose Audio device type = ASIO and the mixer's driver (not ASIO4ALL) / if the buffer cannot be changed in the app, set it in the driver's control panel.
- iPad / Android shows "CONNECT A USB AUDIO INTERFACE" or "RECONNECT USB INTERFACE": re-plug the cable, unlock the screen, check the adapter and power (Lightning: charger in the adapter), then reopen the app.
- iPad shows "CHECK USB I/O - ACTIVE ROUTE UNAVAILABLE": a channel uses a channel number the device does not have, e.g. the card is set to 8/8 or 2/2. Set the card to 32/32 or pick another channel in ROUTING.
- iPad only sees its built-in microphone: iPadOS has not recognised the mixer. Try another cable / adapter or a powered hub; if it still fails, contact us.